From Minor Fixes to Major Repairs – 15 At-Home Products for All Your Car Needs
 Don’t let car issues keep you stranded – try these cheap and effective at-home products for car maintenance and repair
It’s no secret that we spend a lot of time in our cars. Whether we’re commuting to work, running errands, or taking a road trip, our vehicles often become an extension of ourselves. But as much as we rely on our cars, they can also take a beating over time, and nothing is more annoying than car trouble. From the outside, they may go from looking brand new to completely worn out. The paint may fade, the tires may wear thin, and the interior may become stained and cluttered. While it’s inevitable that our cars will show signs of wear and tear, there are ways to extend their functionality and prolong their lifespan. In this article, we’ll offer tips on how to do just that.
And the best thing? You probably already have these products at home. From old socks to rubber bands: these tips are so easy, you would be foolish not to use them.
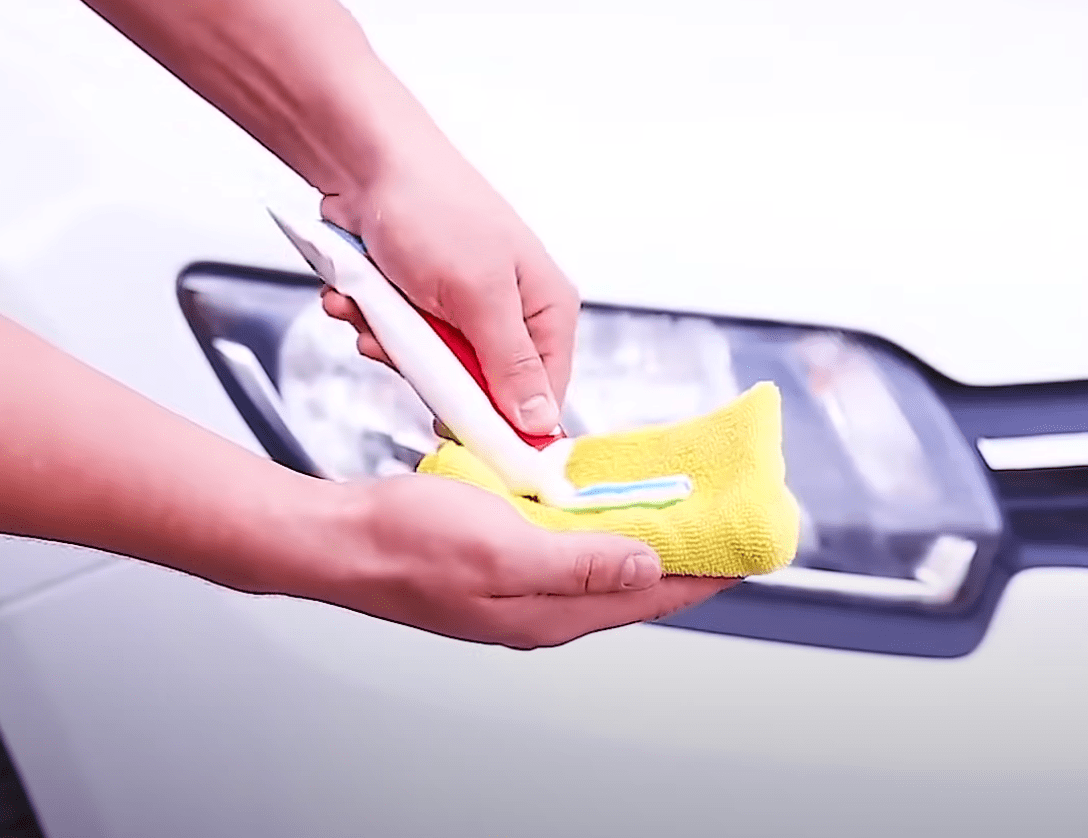 1. Use toothpaste to polish cloudy car headlights
Got cloudy headlights? No problem! Just grab that tube of toothpaste sitting in your bathroom and let it work its magic on your car. That’s right, toothpaste isn’t just for shining up your pearly whites – it can also help to restore the clarity of your car’s headlights.
Over time, car headlights can become cloudy or yellowed due to UV radiation, road grime, and just plain old age. Not only does this make your car look like it’s seen better days, it can also make it harder to see when driving at night. But fear not, because toothpaste is here to save the day (or rather, the night).
To use toothpaste to polish your headlights, simply follow these easy steps:
- Gather your materials. You’ll need a tube of toothpaste (preferably a whitening variety) and a clean, soft cloth.
- Clean the headlights with a mixture of water and dish soap to remove any dirt or grime. This will help the toothpaste to adhere better and allow it to work more effectively.
- Apply a small amount of toothpaste to the cloth and rub it onto the surface of the headlights in a circular motion, applying moderate pressure.
- Continue rubbing the toothpaste onto the headlights until you’ve covered the entire surface. Pay extra attention to any heavily clouded or yellowed areas.
- Allow the toothpaste to sit for a few minutes to work its magic.
- Use a clean, damp cloth to wipe away the excess toothpaste. Rinse the cloth frequently to avoid spreading the toothpaste around.
- Finally, use a dry cloth to buff the headlights to a shine.
Voila! Your headlights will be looking bright and clear in no time. You can also use it for your tail lights and indicators. Just don’t forget to brush your teeth afterwards – you don’t want your car to have brighter headlights than you do!
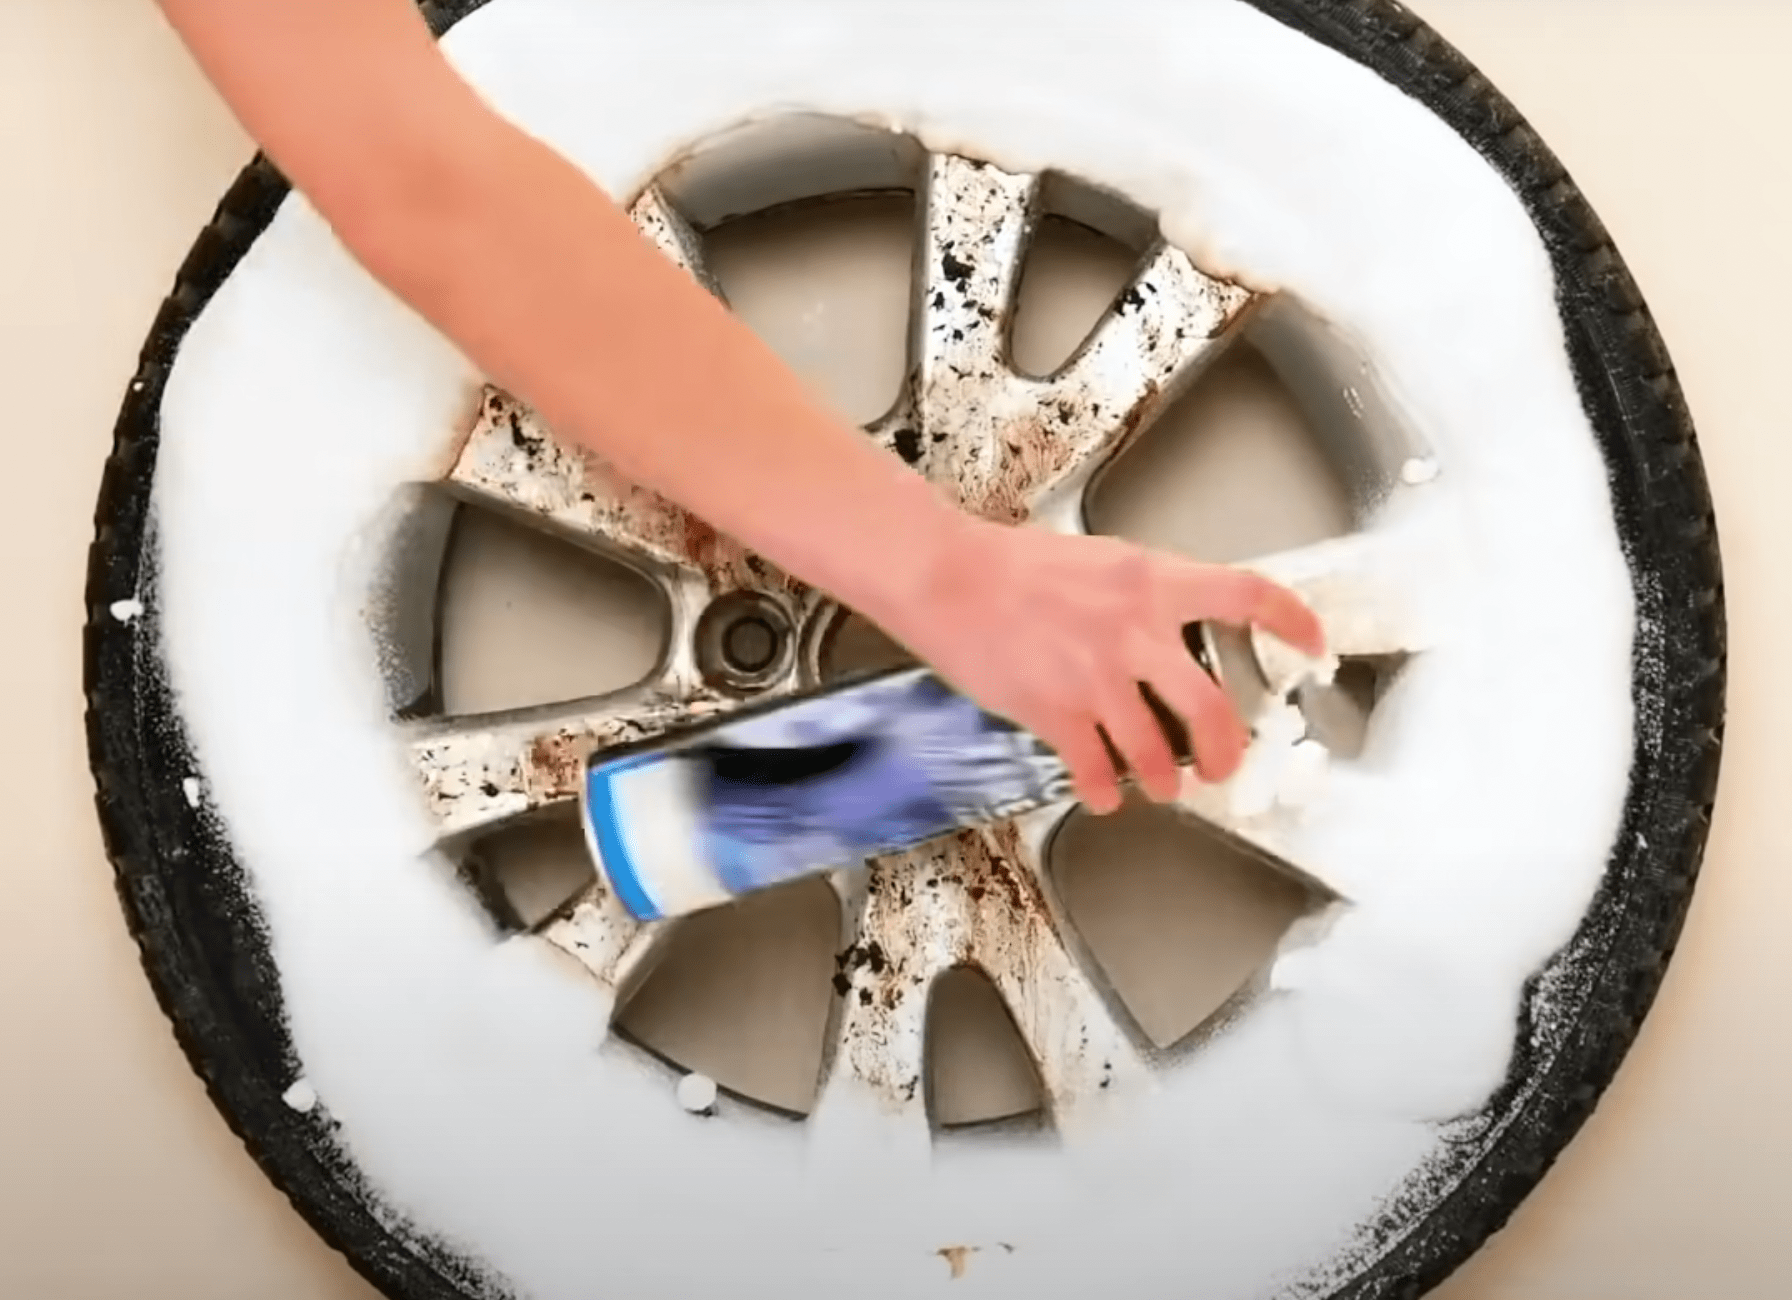
2. Cleaning your tires with shaving foam
We sometimes get the feeling that someone is trying to pull a practical joke when suggesting tips like putting shaving foam on tires. But we tried it and it really does wonders! It turns out, cleaning your tires with shaving foam is a quick and easy way to remove built-up grime and dirt from the treads. Here’s how to do it:
- Start by making sure your tires are cool to the touch. If they have been driven on recently, wait for them to cool down before you begin cleaning.
- Spray a generous amount of shaving foam onto the tires, making sure to cover the entire surface of the treads.
- Use a scrub brush or an old toothbrush to scrub the foam into the tire treads. This will help to loosen any dirt or grime that has accumulated on the tires.
- Rinse the tires off with a hose or a bucket of water.
- Dry the tires with a clean, dry cloth or allow them to air dry.
By following these simple steps, you can easily clean your tires and help to extend their lifespan. Regular tire cleaning can also improve the overall appearance of your vehicle.
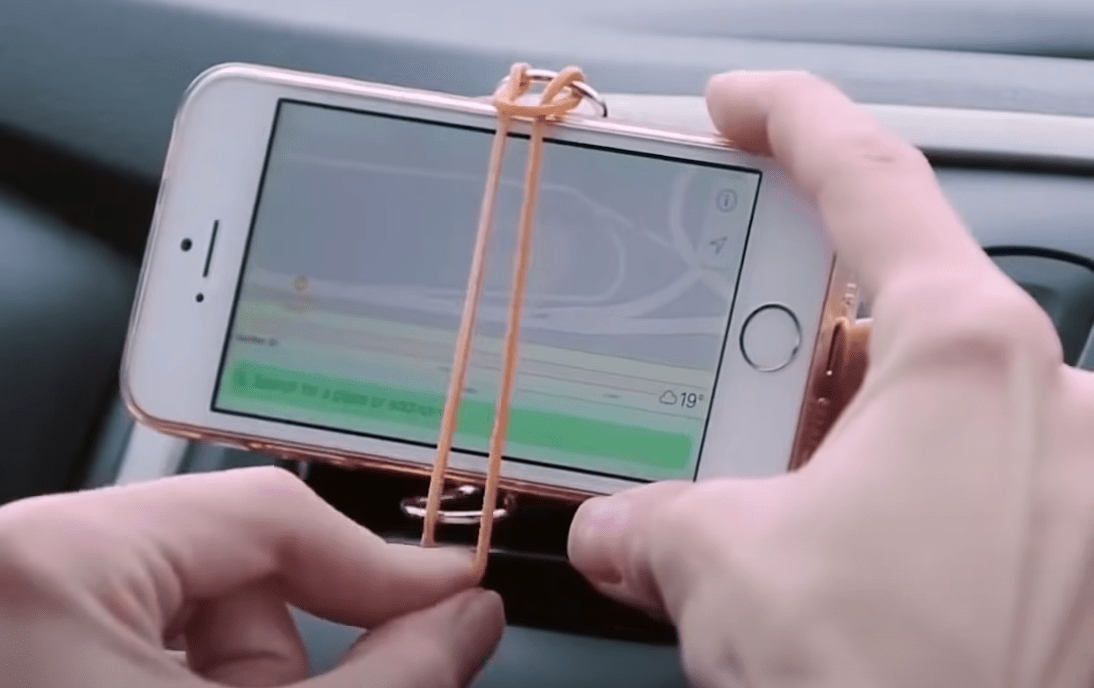
3. Make a smartphone holder using a binder clip and rubber bands
Smartphones have become an integral part of our lives, and they’re especially useful while driving. Whether you’re using navigation apps, streaming music, or taking calls, it’s convenient to have your phone within view while behind the wheel. However, it’s also important to keep your phone secure and avoid distractions while driving. That’s where a DIY smartphone holder comes in.
With just a binder clip and a few rubber bands, you can easily create a smartphone holder that keeps your phone secure and within view while you’re driving. Here’s how to make it:
- Start by gathering your materials. You’ll need a binder clip and a few rubber bands. The size of the binder clip will depend on the size of your phone, but a medium or large size should work for most phones.
- Next, attach the binder clip to a vent in your car. You can do this by opening the arms of the binder clip and placing it over the vent grille. The clip should hold securely in place.
- Once the binder clip is attached to the vent, it’s time to attach your phone. Take one or two rubber bands and wrap them around the handle of the binder clip. Make sure the rubber bands are snug and secure, as you don’t want your phone to fall out while you’re driving.
- Finally, attach your phone to the rubber bands by slipping the edges of the phone between the bands. The rubber bands should hold the phone securely in place, allowing you to access it easily while driving.
That’s all there is to it! With just a binder clip and a few rubber bands, you can easily create a DIY smartphone holder that keeps your phone secure and within easy reach while you’re driving. It’s a quick and easy solution that can be made in just one minute, and it’s an affordable alternative to store-bought holders. So next time you hit the road, give this simple DIY project a try and see how convenient it can be to have your phone at your fingertips while driving. Just be careful not to text and drive – that’s still illegal (and dangerous)!
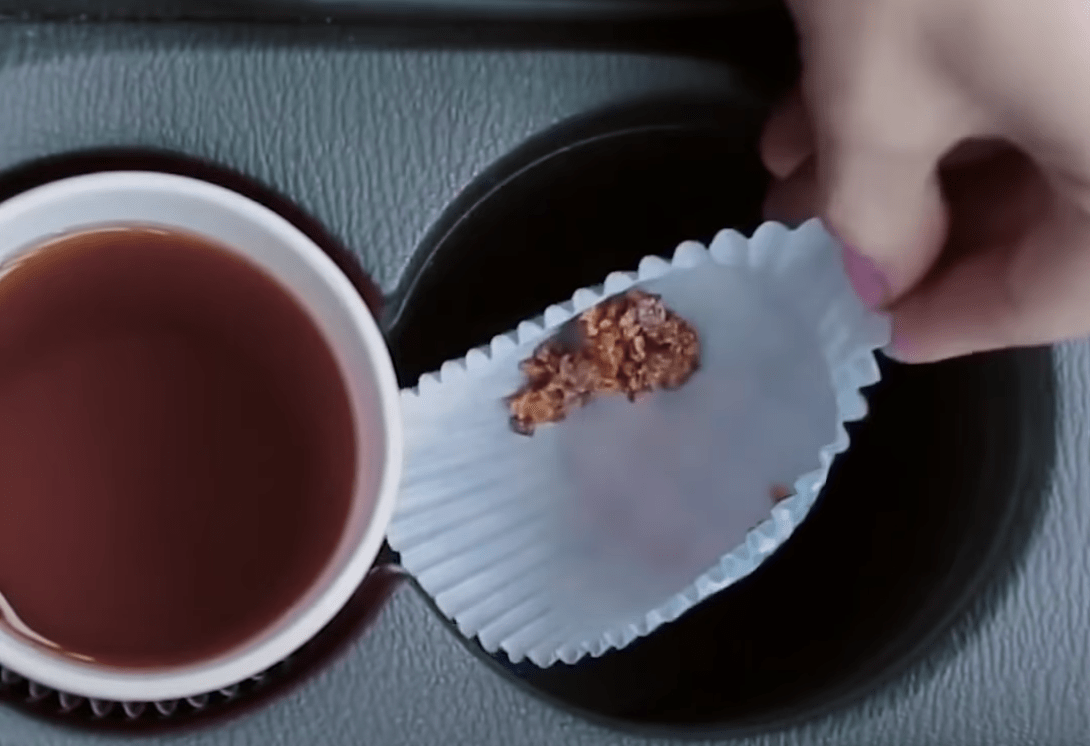
4. Use paper cupcake liners to keep cup holders in your car clean
Here we have a ridiculously cheap but super effective tip! All you need is paper cupcake liners to save the day. If you’re someone who values cleanliness and organization, you know how frustrating it can be to keep your car’s cup holders free from debris and spills. No matter how careful you are, it seems like there’s always something that manages to find its way into the cup holders, leaving them sticky and cluttered. But there’s a simple and affordable solution to this problem: paper cupcake liners. Yep you read that right.
Here’s how to use paper cupcake liners to keep your car’s cup holders clean:
- Begin by cutting the paper cupcake liners in half. This will make them the perfect size to fit into your car’s cup holders.
- Once you’ve cut the cupcake liners in half, simply place them into the cup holders. The liners will help to catch any spills or debris, keeping your cup holders clean and clutter-free.
- When the liners become dirty or cluttered, simply remove them and replace them with fresh ones. It’s that easy!
It’s as easy as that! No more digging around in grossness, no more sticky cup holders. Just clean, colorful joy. So go ahead, give it a try and watch your cup holders transform from gross to glam in no time. And hey, if you’re feeling really fancy, you can even match the liners to your mood or outfit. The possibilities are endless (well, at least as endless as the colors of cupcake liners).
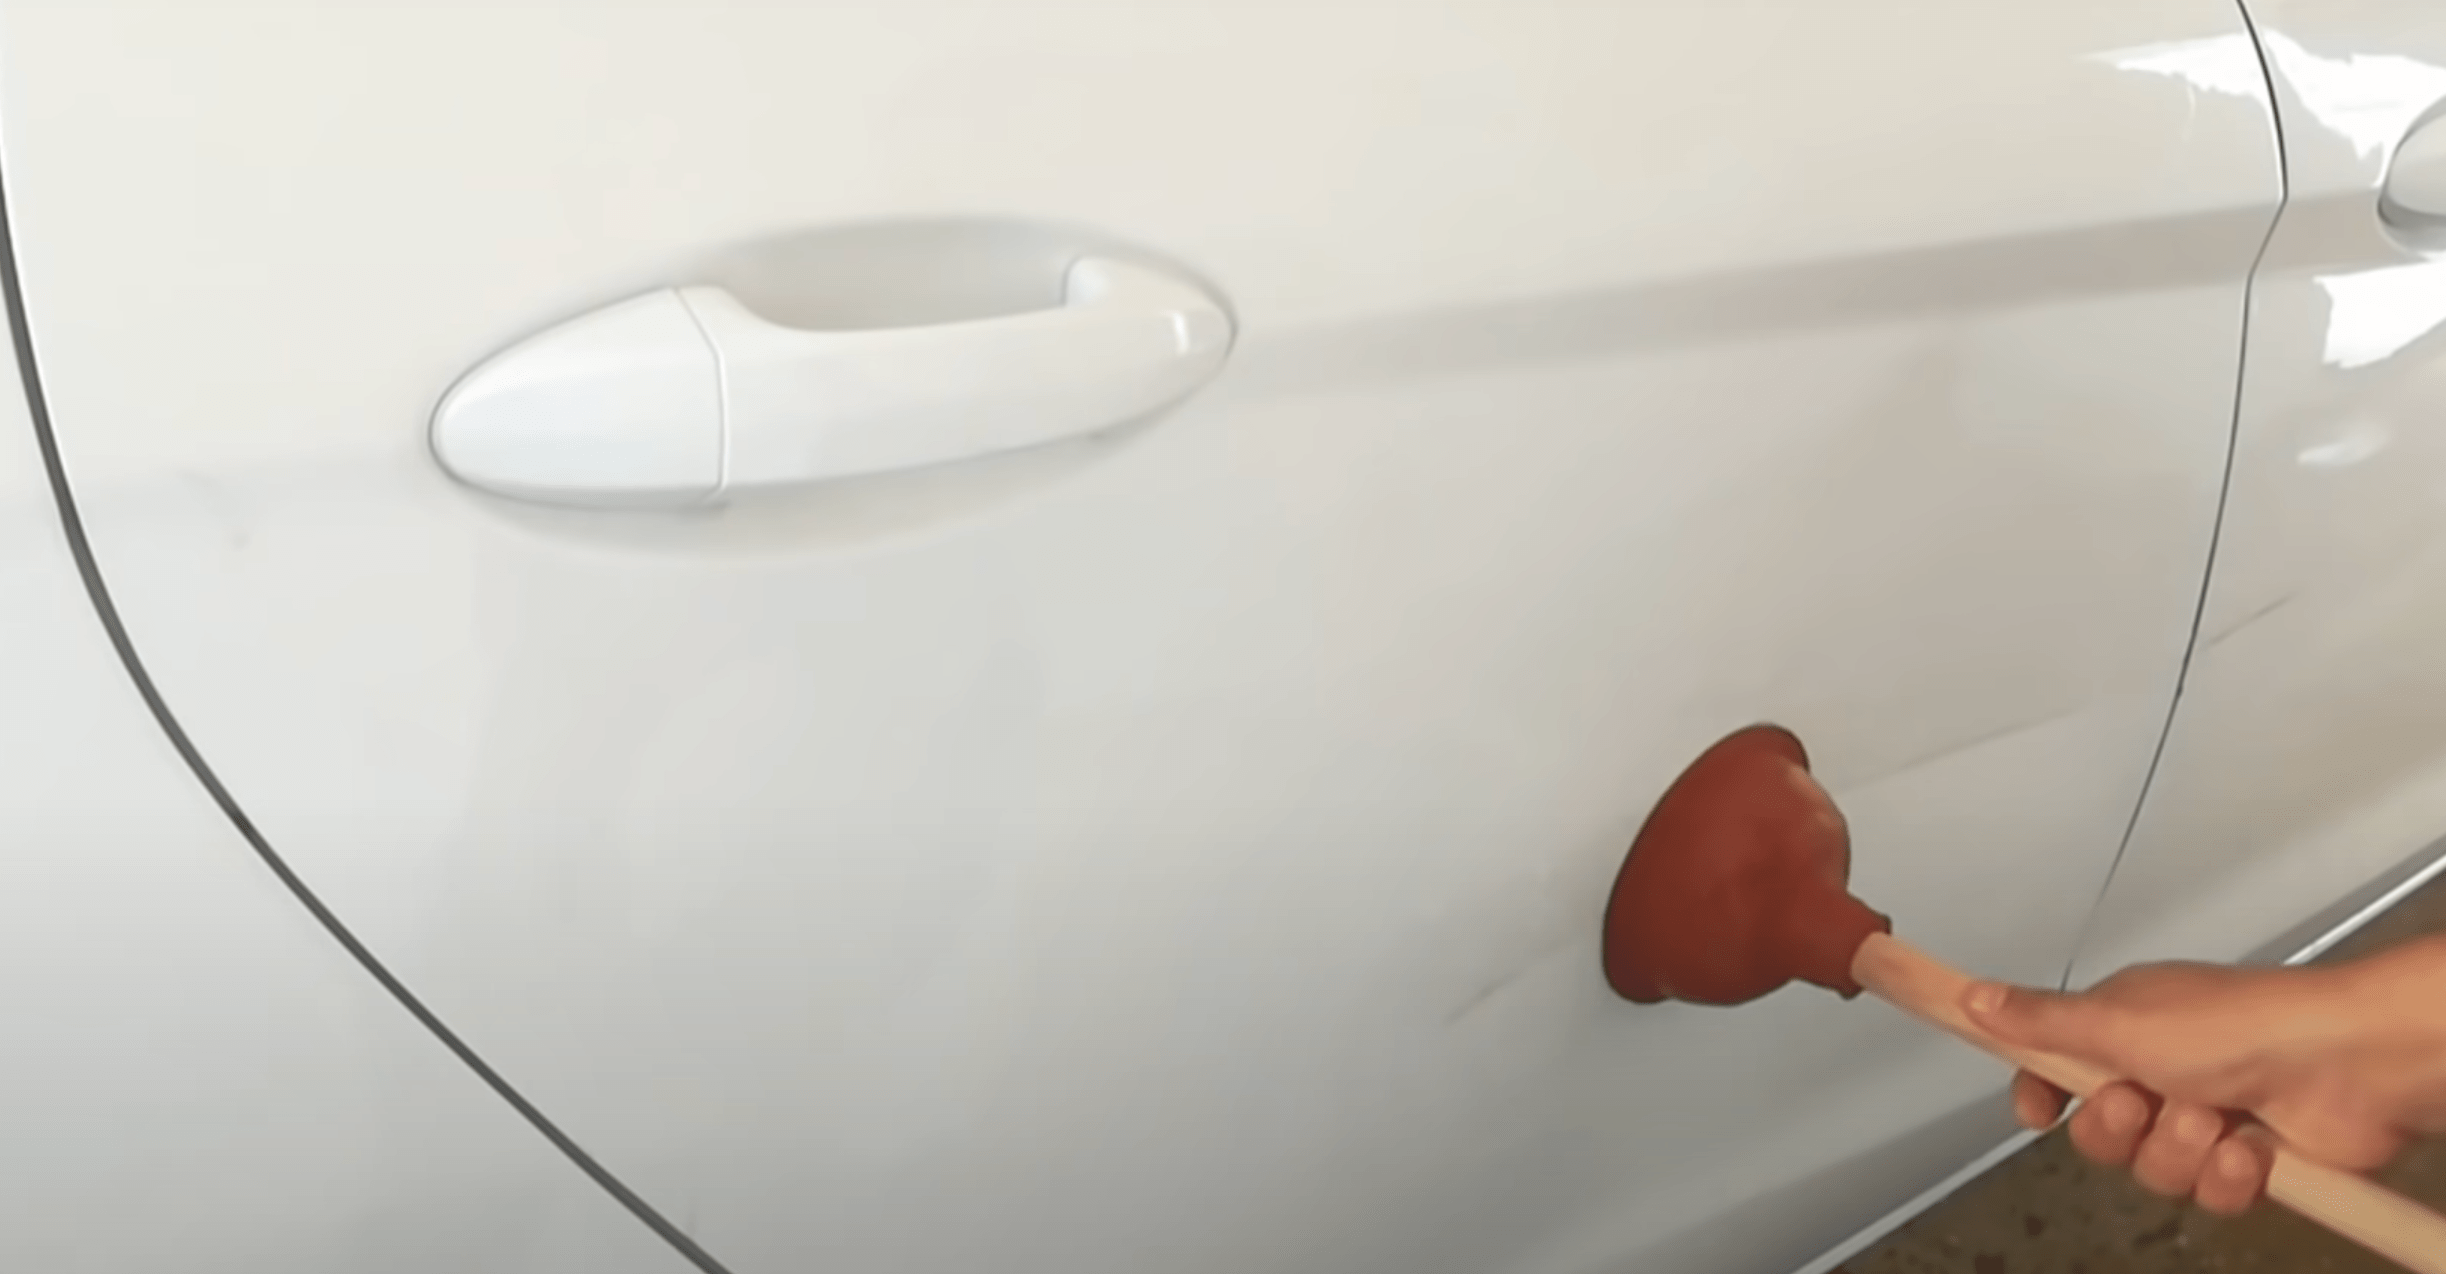
5. Fix dents and dings with a plunger
Every car needs some emergency essentials. So take note: jumper cables, flare and matches, or some reflective emergency triangles, and most importantly: a plunger. Wait, what?! A plunger? Yes, we’re not kidding.
For larger dents and dings on your car, you may want to try using a plunger as a makeshift tool. It might seem strange, but a plunger can actually be quite effective at removing dents from car bodies. Here’s how to use a plunger to try and fix a dent:
- First, wet the plunger by running it under some water. You want the rubber to be moist, as this will help create a strong suction when you use it.
- Next, position the plunger over the dent on your car. The plunger should be facing the same direction as the dent, with the rubber side down.
- Press down on the handle of the plunger to create suction. You may need to use some force to get a good seal.
- Once the plunger is securely in place, try gently pulling and pushing on the handle. This motion can help to create a pumping action that may cause the dent to pop out.
- If the plunger method doesn’t work, you can also try using a hair dryer to heat the area around the dent. The heat can make the metal more pliable and easier to manipulate. To do this, simply turn on the hair dryer and direct the heat towards the dent for a few minutes. Then, try using your hands or a tool like a spoon to gently press the dent back into place.
Just imagine it: you’re at a fancy party and someone bumps into your car, leaving a giant dent. But fear not, you have a trusty plunger in your trunk. You whip it out and within minutes, that dent is gone like it was never even there. You’ll be the talk of the party!
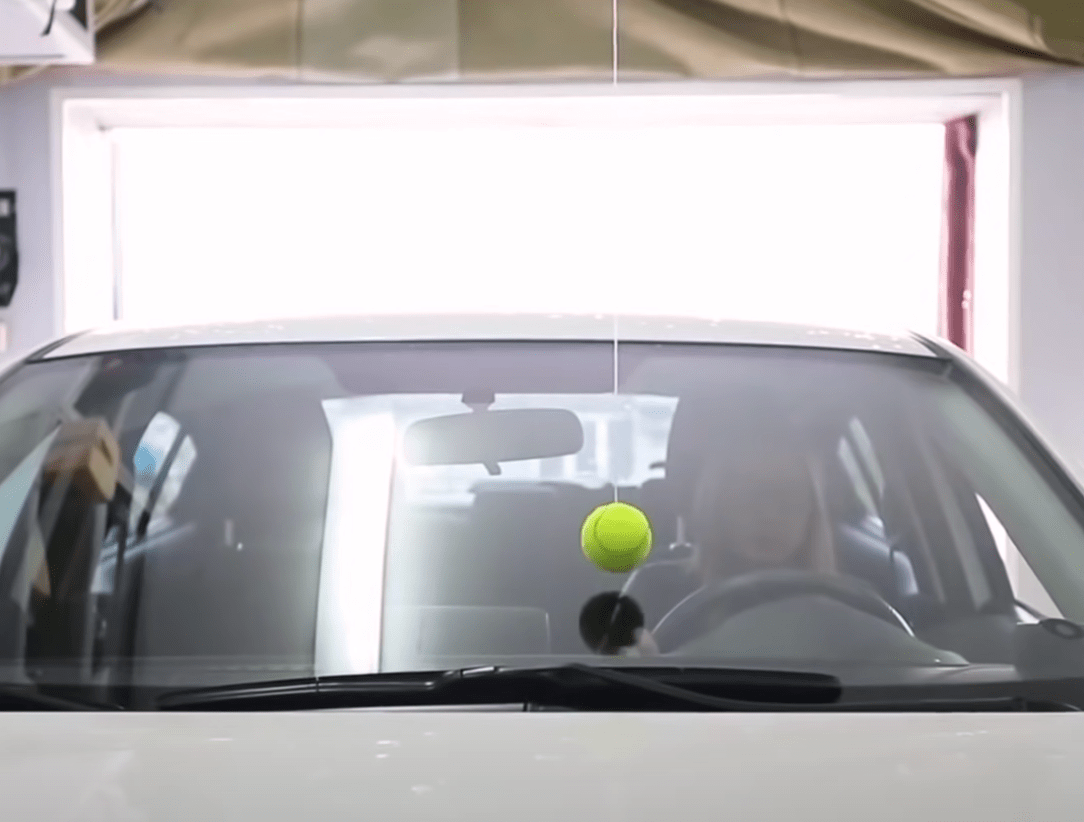
6. Use a tennis ball to help you park
Are you tired of misjudging the distance between your car and the walls of your garage, only to end up with dents and scratches on your doors? Or perhaps you’re a new driver who is still getting the hang of parking in tight spaces. Either way, there’s a simple solution that can help you park more accurately and avoid damaging your car: attach a tennis ball to the ceiling of your garage.
Here’s how it works:
- You’ll need a tennis ball and a way to attach it to the ceiling of your garage. Some options include a string or cord, a suction cup, or a hook. Choose the option that works best for your garage and your needs.
- Next, attach the tennis ball to the ceiling of your garage. Depending on the method you choose, you may need to drill a small hole in the ball and thread the cord or string through it. Alternatively, you can use a suction cup or a hook to hang the ball from the ceiling.
- Once the tennis ball is securely in place, you can use it as a guide when parking your car. Simply aim for the ball and stop when you make contact with it. This will help you to gauge the distance between your car and the walls of your garage, allowing you to park more accurately and avoid damaging your doors.
- If you find that the tennis ball is too high or too low for your needs, you can adjust the height by adjusting the length of the cord or string, or by using a different attachment method.
So next time you’re pulling into your garage, just look for that trusty tennis ball and let it guide you to a perfect parking job. No more dents, no more scratches. And hey, we won’t tell anyone…
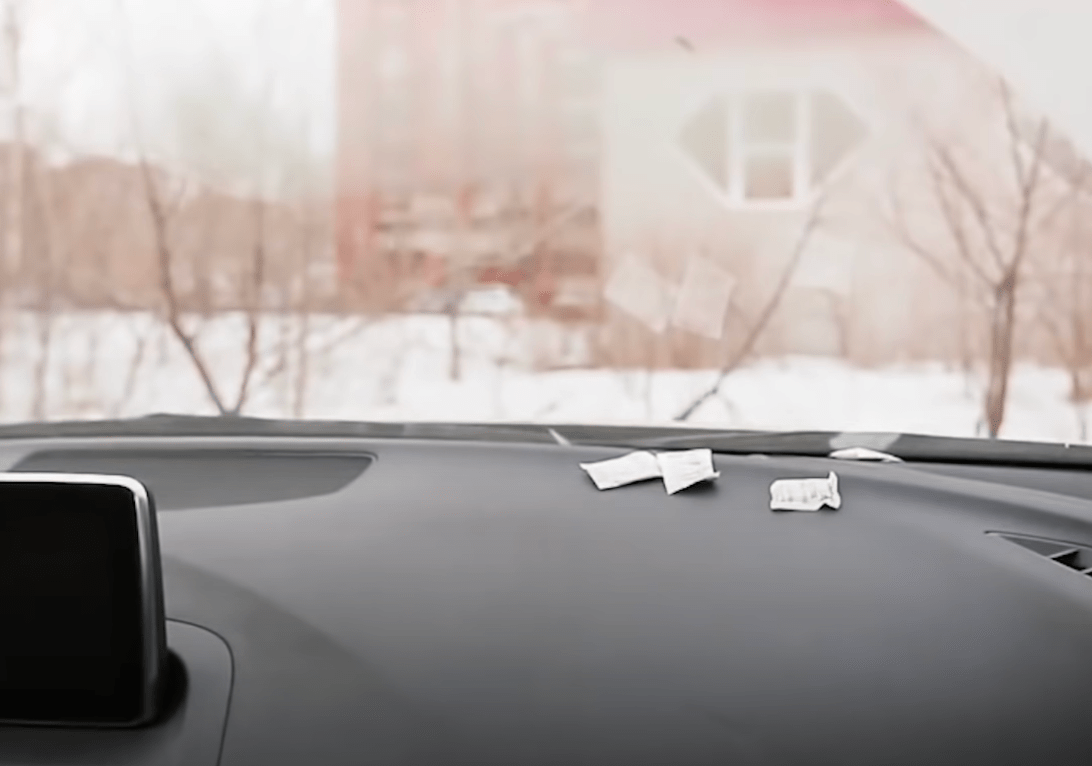
7. Prevent foggy windshields with silica gel pouches
If you’re like most people, you probably have a collection of silica gel pouches tucked away in a drawer or cabinet somewhere. These pouches are often included in packages to help protect items from moisture during shipping, but once you open the package, you may find yourself wondering what to do with them. While it’s tempting to just toss them in the trash, there’s actually a much better use for these pouches: preventing foggy windshields.
Here’s how it works:
- Start by gathering your silica gel pouches. You’ll need a few pouches to make a noticeable difference in your car’s windshield.
- Place the silica gel pouches in your car, either on the dashboard or in the glove compartment. The pouches will help to absorb moisture from the air, which can help to prevent foggy windshields.
- If you live in a particularly humid area, or if you tend to drive with a lot of people in your car, you may want to place more pouches in your car to increase their effectiveness.
- As the pouches become saturated with moisture, they will become less effective. When this happens, simply replace them with fresh pouches.
By using silica gel pouches in your car, you can help to prevent foggy windshields and improve visibility while driving. It’s a simple and affordable solution that can make a big difference in your safety and comfort on the road. So next time you’re wondering what to do with those leftover silica gel pouches, give this simple trick a try and see how much it can help.
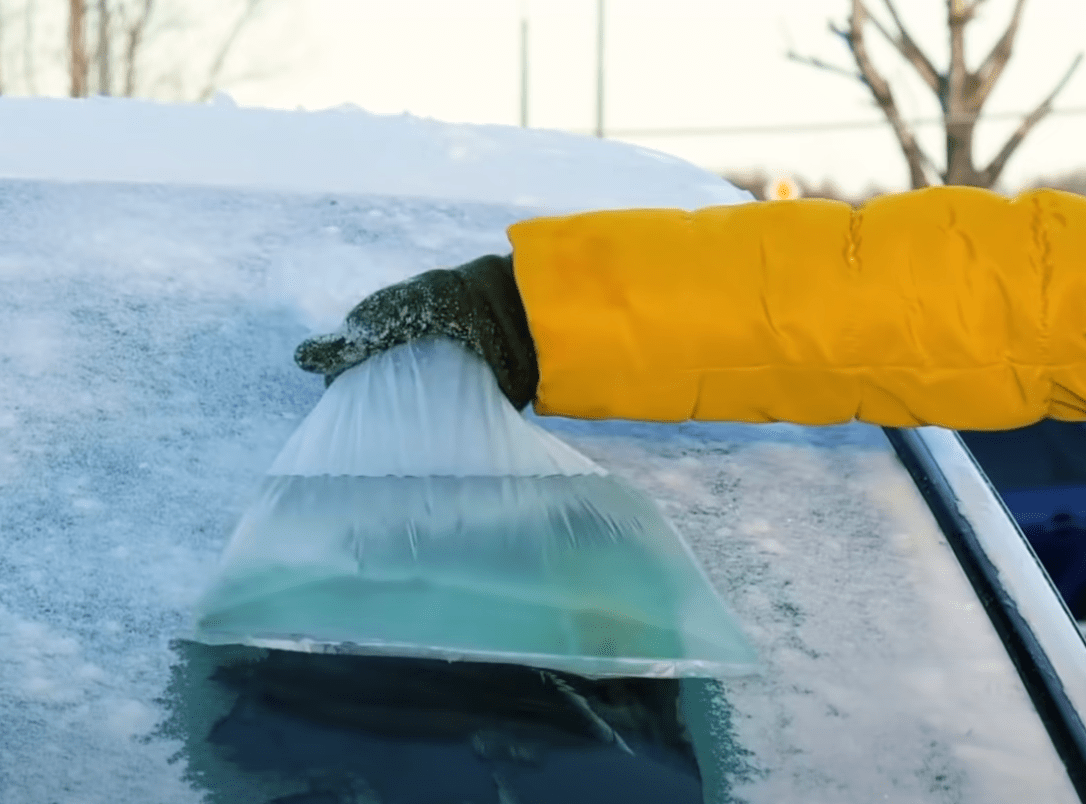
8. Use a bag of hot water to deal with icy windshields
If you live in an area that experiences cold weather, you know the frustration of getting up in the morning and finding out that you have to deal with icy windshields. Scraping ice off the windshield can be time-consuming and labor-intensive, not to mention the risk of damaging the glass. But there’s a simple and effective way to remove ice from your windshield: hot water.
Here’s how to use hot water to remove ice from your windshield:
- Start by heating up a pot of water on the stove. You’ll need enough water to cover the icy areas of your windshield.
- Once the water is hot, carefully pour it over the icy areas of your windshield. Be sure to pour the water slowly and evenly to avoid cracking the glass. You can also be extra careful and put it in a plastic bag as shown in the image above.
- As the hot water comes into contact with the ice, it will begin to melt. Use an ice scraper to gently remove the ice from the windshield.
- If the ice is particularly thick or stubborn, you may need to repeat the process a few times.
- Once the ice is completely removed, use a dry cloth to wipe away any remaining moisture.
By using hot water to remove ice from your windshield, you can save time and effort compared to traditional scraping methods. Plus, the heat from the water can help to loosen the ice and make it easier to remove. Just be sure to use caution when handling hot water, and avoid pouring it too quickly or too forcefully to prevent cracking the glass.
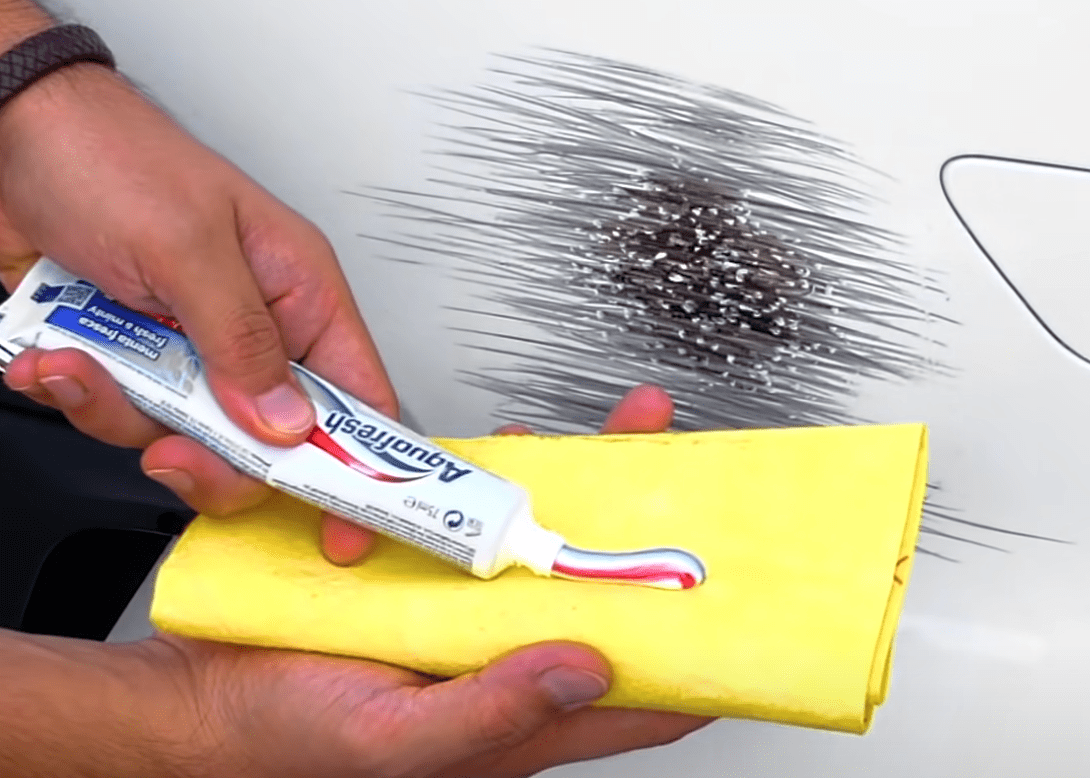
9. Use toothpaste to remove stains
Who knew toothpaste could be so useful? Other than using it to clean your teeth (or polish your car headlights as explained in number 2), it can be used for a wide variety of tasks. One use that may surprise you is removing stains from your car. Whether you’re dealing with stains on the upholstery, carpets, or exterior paint, toothpaste can be an effective way to lift and remove stubborn stains.
Here’s how to use toothpaste to remove stains from your car:
- You’ll need a tube of toothpaste (preferably a whitening variety), a soft cloth, and a small bowl of water.
- Begin by applying a small amount of toothpaste to the stain. Rub the toothpaste into the stain using a circular motion, applying moderate pressure.
- Once the toothpaste is applied to the stain, allow it to sit for a few minutes to allow it to work its magic.
- After the toothpaste has had a chance to sit, use a damp cloth to wipe away the excess toothpaste. Be sure to rinse the cloth frequently to avoid spreading the toothpaste around.
- If the stain is particularly stubborn, you may need to repeat the process a few times.
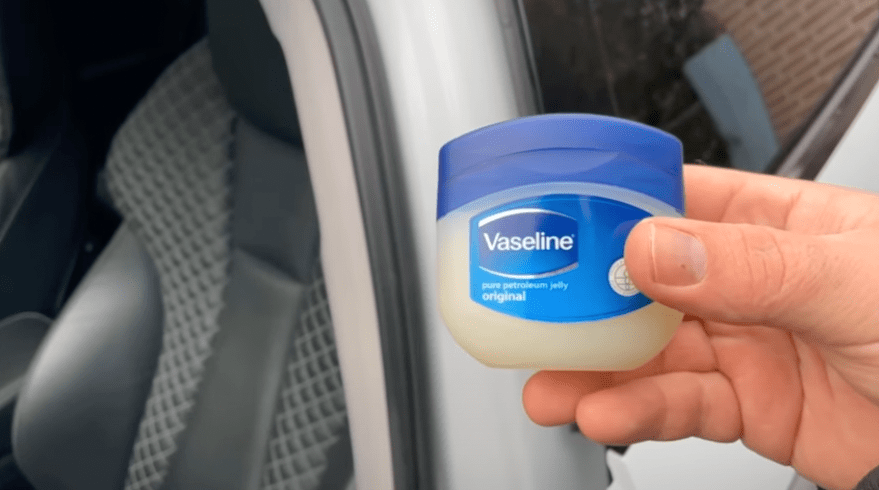
10. Use vaseline to open your door when it freezes
Are you tired of being stranded outside in the cold because your car door is frozen shut? Never fear, vaseline is here! By applying a generous amount of this slippery, greasy substance to the door seal of your car, you can prevent water from collecting between the door and the rubber seal, which can freeze and make it difficult to open the door.
Just think of vaseline as your own personal door de-icer. Simply squeeze a dollop onto your finger (or use a clean cloth or small brush if you’re feeling fancy) and rub it into the door seal. Make sure to cover the entire seal, including the corners and edges. You’ll be amazed at how well this stuff works to keep your car doors functioning smoothly, even in the coldest of weather.
But wait, there’s more! Not only does vaseline help to prevent your car doors from freezing shut, it also provides an extra layer of protection against dry, cracked rubber. So not only will you be able to get into your car on those cold winter mornings, you’ll also be helping to preserve the lifespan of your door seals.
So, if you want to avoid being the person at the office who shows up late because they couldn’t get into their car, give vaseline a try!
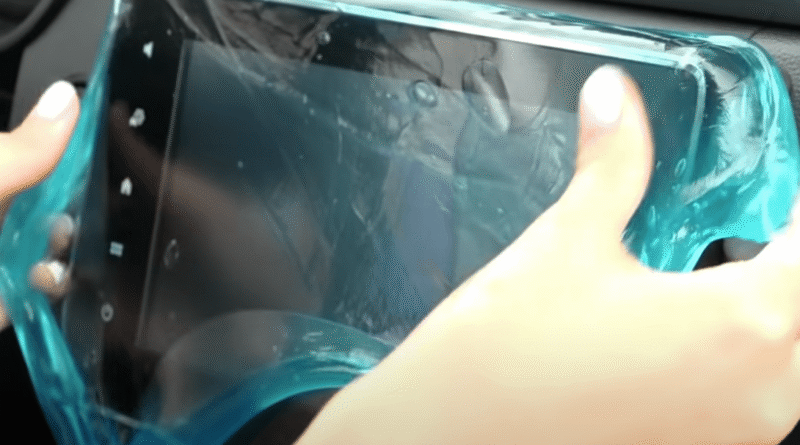
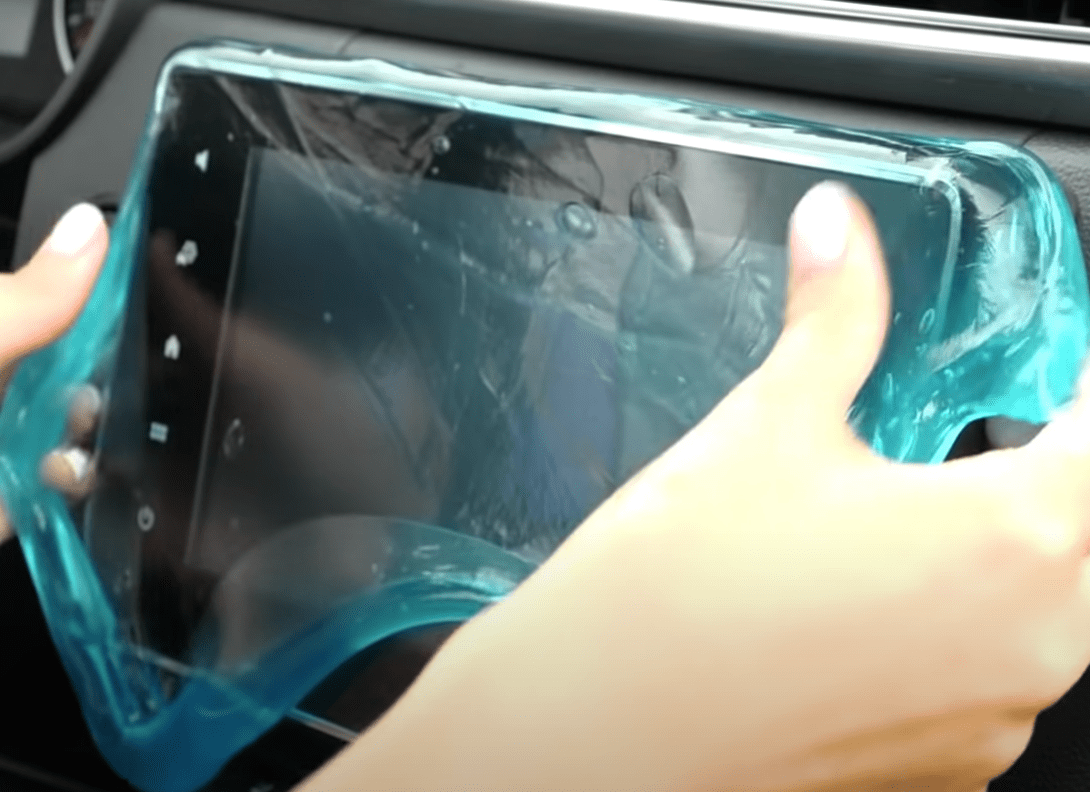 11. Clean your car with slime
Wait, what the…?! Slime? Yep. For this tip, you might need to search the toys of your children, nephews, or the local daycare. This product can be seen everywhere amongst kids so you may probably have to borrow it for a while. You might think of slime as a fun toy or a messy nuisance, but it turns out that it can actually be an amazing cleaning tool for your car. Thanks to its unique texture, slime can easily get into crevices and pick up crumbs and dust with its slightly sticky surface. And best of all, it leaves no residue behind on the surface itself.
Here’s how to use slime as a cleaning hack for your car:
- You’ll need a batch of slime (homemade or store-bought), a small container, and a dry cloth.
- Begin by scooping a small amount of slime into the container. You’ll want enough slime to cover the areas you’re cleaning, but not so much that it becomes difficult to handle.
- Once you have your slime ready, use it to clean the surfaces of your car. You can use it to pick up crumbs and debris from the seats and floor mats, or to dust off the dashboard and controls.
- As you clean with the slime, you’ll notice that it picks up dirt and debris easily, thanks to its slightly sticky surface. You can use your fingers or a dry cloth to help remove the dirt and debris from the slime.
- When you’re finished cleaning, simply discard the used slime and wipe down the surfaces with a dry cloth to remove any remaining slime residue.
Now, imagine yourself driving down the road, with the sun shining and your car looking brand spankin’ new, all thanks to your trusty slime cleaner!
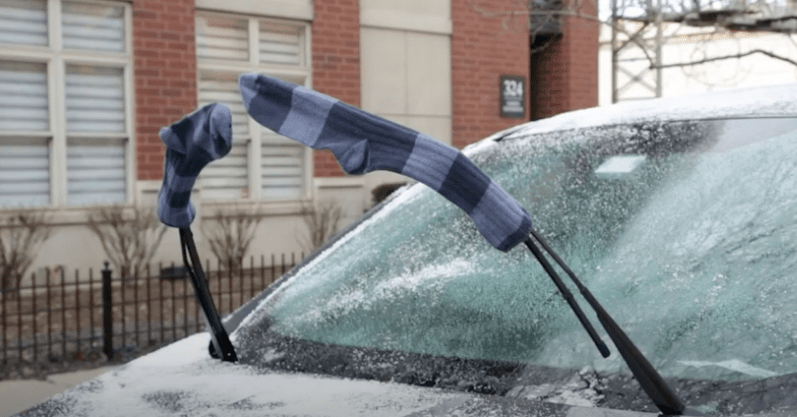
12. Use old socks to protect your windshield wipers
What the freak are we looking at?! You must think. Protecting your windshield wipers with socks? Yep. Seriously. We are not kidding. A cold-weather problem we know all about is waking up in the morning to find out that your windshield wipers have become stiff and brittle due to freezing temperatures. When wipers are exposed to freezing temperatures they will be less effective at clearing snow and ice from your windshield. An easy way to protect your wimpers is by using old socks. This can also help your wipers from scratching your window glass. Here’s how to use old socks to protect your windshield wipers in winter:
- Start by gathering your materials. You’ll need a pair of old socks and some rubber bands or bungee cords.
- Begin by slipping the socks over the wipers. The socks should fit snugly over the wipers, with enough room for the rubber bands or bungee cords.
- Once the socks are in place, use the rubber bands or bungee cords to secure them in place. This will help to keep the socks from sliding off the wipers.
- When you’re ready to use your wipers, simply remove the socks and rubber bands or bungee cords.
So next time your grandma gives you woolen socks again, be thankful because they might come in really handy.
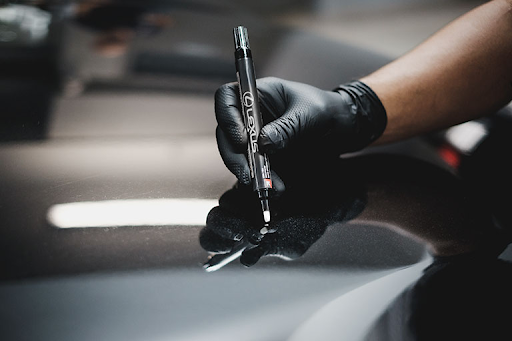
13. Touch up scratches and chips in the paint.
If your car has small scratches or chips in the paint, you can often fix them yourself at home using a touch-up pen or brush. These products are specifically designed to help you repair small imperfections in your car’s paint job, and they can be found at most auto parts stores or online. Here’s how to use a touch-up pen or brush to fix scratches or chips in your car’s paint:
- First, clean the area around the scratch or chip thoroughly. Use a mild soap and water to remove any dirt or debris, and then dry the area with a clean cloth.
- Next, shake the touch-up pen or brush well to ensure that the paint is well-mixed.
- Carefully apply the paint to the scratch or chip, following the product’s instructions. Some pens have a brush built into the cap, while others come with a separate brush. Either way, make sure to apply the paint evenly and smoothly.
- Let the paint dry according to the product’s instructions. This usually takes anywhere from a few minutes to a few hours, depending on the product.
- Once the paint is dry, you may want to apply a clear coat to help protect the repair and make it blend in better with the surrounding paint. Simply follow the instructions for your clear coat product and apply it in the same way you applied the touch-up paint.
Keep in mind that touch-up pens and brushes are not a perfect solution for all scratches and chips. They are best for small imperfections, and they may not completely remove or hide larger scratches or deeper chips. However, they can be a quick and easy way to make minor repairs and improve the appearance of your car.
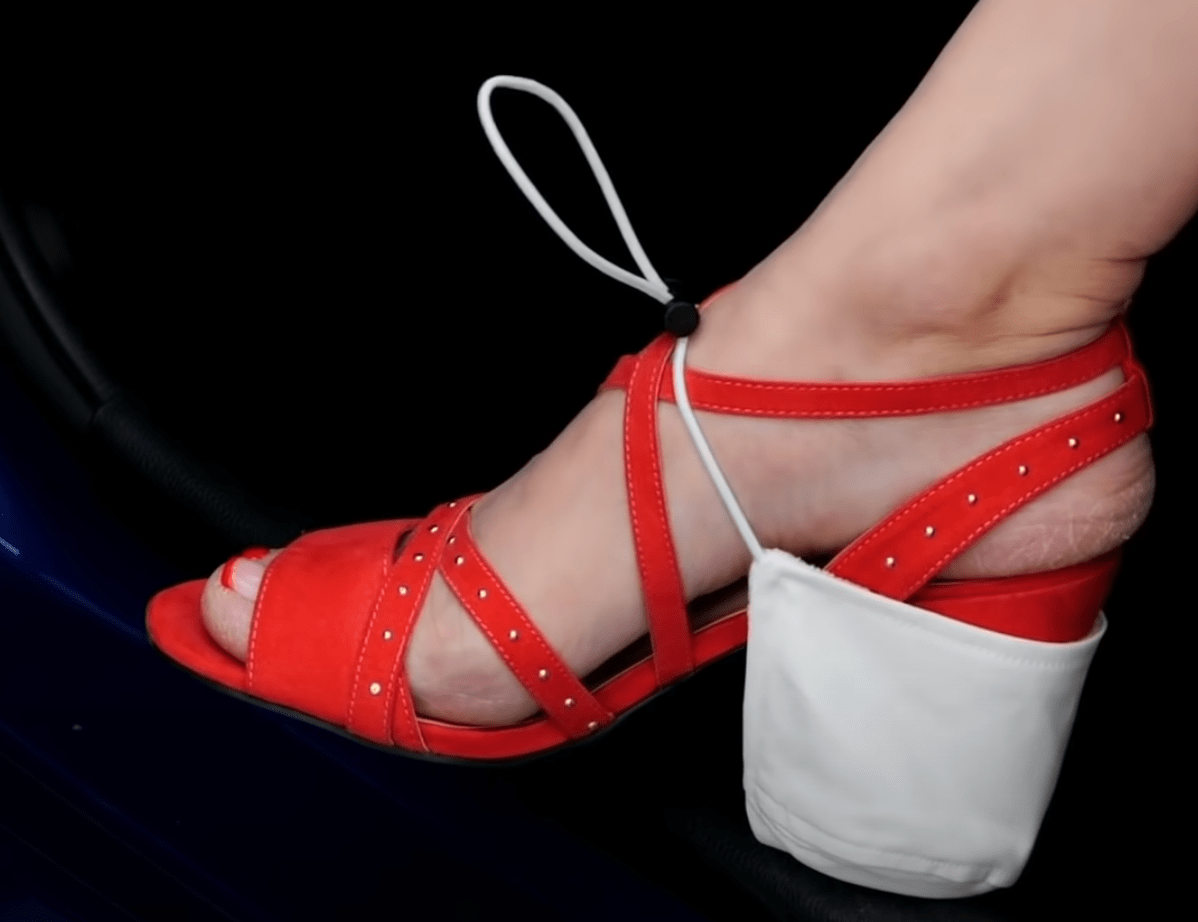
14. Use a face mask to protect your heels
If you’re tired of constantly having to clean dirt and debris off your heels after driving, a face mask can be a simple and effective solution. By covering your heels with a mask, you can protect them from the elements and keep them looking clean and polished.
To use a face mask to cover your heels while driving, simply slip the mask over your heels before you get in the car. Make sure that the mask fits snugly and doesn’t restrict your movement. Then, sit back and enjoy the ride, knowing that your heels are protected from dirt and debris. Just don’t forget where the mask has been to avoid placing it over your mouth and nose again!